Friday 27 October 2023

Headcoverings 2 of 2

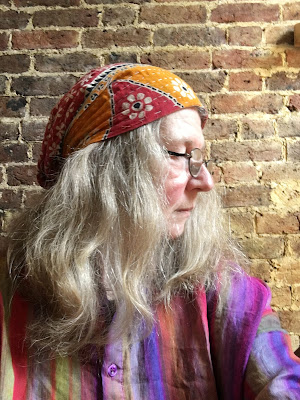
I wear headcoverings mostly just because I like them. One of the things I enjoy is that there is a sort of spiritual resonance/connotation, and I feel the energy/vibration of it when I wear a head covering. 

In my case, it isn't a statement — it's not an ideological declaration — but it exerts an undeniable influence on how I feel. It emanates peace for me, and is a reminder to live quietly and intentionally. It speaks to me of the slowness and simplicity I would like to characterise the path I choose to walk.

But it's not a partisan affiliation of any kind, religious or cultural. It's just me.

Here is how to make the kind I wear.

I make them from vintage kantha scarves sourced on eBay from India.

Here's one I made a hat from today. 


They are made from two sheets of Indian cotton stitched together, so this is the reverse side.


The hat is made to fit my own head, so the sizing for one you make will depend on your head size and how loose/tight you like it to be. You might need to experiment a bit. 

There's only two measurements you need — the first is from behind the lower part of your right ear up over your head to behind the lower part of your left ear. For me that's a little less than 20 inches. I have a M/L size head.

You'll also be sewing a channel for elastic, so you need to add on an inch or so to accommodate that.


The second measurement is the front to back (brow to back of head). For me that's about 15/16 inches plus an allowance for the channel I'll be sewing for the gathering elastic. So I cut at maybe 16.5 inches.


Here's the piece I cut from the kantha scarf to make my hat.


Next, you cut it into a sort of flattened D shape, like this.  


Then you use a steam iron to press the raw edge in. You can stitch that down if you're feeling industrious, or just leave it pressed like this.


Then fold and press again to make a channel for the elastic to thread through.


Stitch it down all the way round. 


The stitches will show through on the other side of course, but it won't matter, as you'll soon see.

Now you are ready to put in the elastic. This is how much I use.


Yes. I can never get over how short a piece it is! about 5 inches, just over.

You use a safety pin to thread elastic through the channel. 


The tail needs to be pinned in place so it doesn't just get pulled through.


The elastic gathering is what determines how loose/tight the hat will be, so you'd be wise in the first instance to pin before you sew. The elastic has to be sewed in place very firmly, because it's under such tension. You won't want to be unpicking that again. Pin first, then sew.


Then, when you are happy with the result, stitch the elastic in place really well at the 2 ends of the channel, both the protruding ends and where you can feel it inside the channel.


That's all. You're done.

You can see that though one side makes a contrast edging, it doesn't matter, that looks fine as a decorative detail. The hat is still reversible.


Here it is on.

Front.


Side.


Reversed.


Done. Hand-sewn, one and a half hours max. 

Headcoverings 1 of 2

 Headcoverings have been happy travelling companions for me over about 25 years.

At the point we came into the 21st century, I liked wearing a tied scarf. Here's a photo of what I wore back then.  


Here's a demonstration (outdoors on a breezy day!) by my daughter Hebe, who first showed me how to tie a scarf like this. You take a square headscarf, fold it in half into a triangle, position it as you wish on your head, tie the long ends at the nape of your neck, roll the long ends lengthwise, bring them up to cross over the top of your head like a crown, tuck each end round and round into the opposite one to secure them, then tuck in the loose bit left at the nape of your neck.


Though this wasn't hard, I wanted something easier.

Around 2008 or so, I got interested in the kapps the Amish wear. I had some, but they looked a bit like a costume in our neighbourhoods, so about 2010 I went on to making my own hats — quick and easy to slip on, and (slightly) less culturally weird for where I live.


I wore these for a while, sometimes with my hair longer sometimes shorter like this photo below which must have been around 2012. I adapted the hats to be larger and looser, moving away from the style that perches on the back of the head in favour of one that sits on the head like a normal hat.


The ones I made at that time were from old dishtowels that I over-dyed.

As time went on, I preferred to stay with the same simple style (if you ever watch my Campfire Church thinkabouts on my Youtube channel, you can see the evolution of hair and hats).

This summer just gone, I wanted to make some new ones, but I didn't have the right kind of fabric. I wanted something soft and vintagey — old dishtowels are just right, but we had a new washing machine and my housemates felt no enthusiasm for ruining it with clothes dye.

So then I decided to cut up a kantha shawl I'd had for some years. It's been used as a curtain and a table cloth and an altar cloth, but mostly it just sat around unused.

The great thing about kantha stoles/shawls/scarves is that they are double-sided, so you get two hats in one. Also they are made from vintage saris, so they are soft Indian cotton in the first place, made sublimely soft by much use and wear. You can get two or three hats out of one scarf, and as they are reversible that's in effect 6 hats. You don't have to be a mathematician to figure out that's a whole lot cheap than buying a head covering on Etsy.

Here's one I made this summer.

This is what it looks like from the side. 


In the next post I'm going to show you how to make them, because recently a lady approached me in the grocery store wanting to know where I got my hat from. So in case you like them too, I'm going to show you how.